Now what can I say?
I am really looking forward to find a text about this great model and it ain't easy as i just think about painting it all the time. Now I'll do a little break from painting to get things mixed and keep me motivated. Hah! I am motivated like hell and this great model is the reason for it.
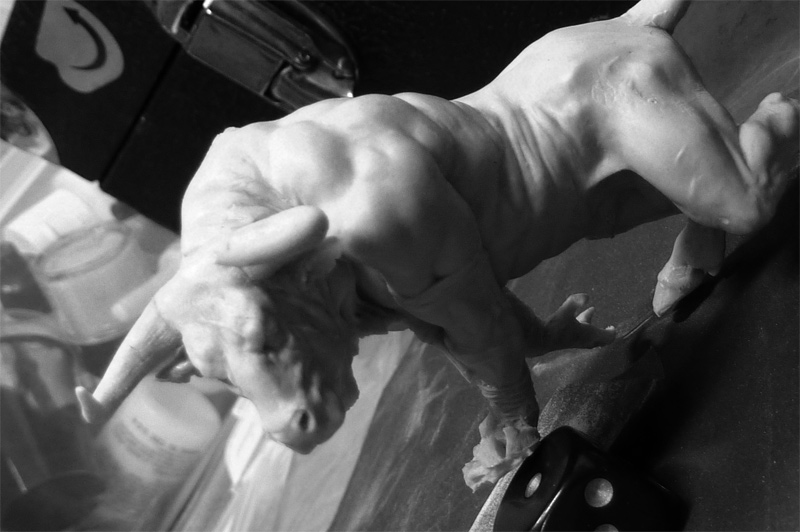
I always liked the models of the company Spherewars but never did get hold of one so far. In fact i do love the Hombre models for their dynamic poses and alive looking great concepts, for example this one or that one. I planned to paint both of them someday as i am just in love with these sculpts. But now, suddenly through the dark Forest breaks a big mountain of flesh and hits hard directly in my heart. El Hombre Toro - a model that i would say is one of the best from the feeling and good vibration you get when preparing and painting it. It is alive and it will call your brush to unimaginable fortune. I feel in love from the first second on i saw photos of the sculpt. Now i want to take you on a trip having me talking about unpacking this beast. This is what it looks like when you get it:


This is a big blister with everything included, also dice for gaming. Unpacking it brings you the following parts:
1x Gaming Base
1x Big Black dice
1x small white dice
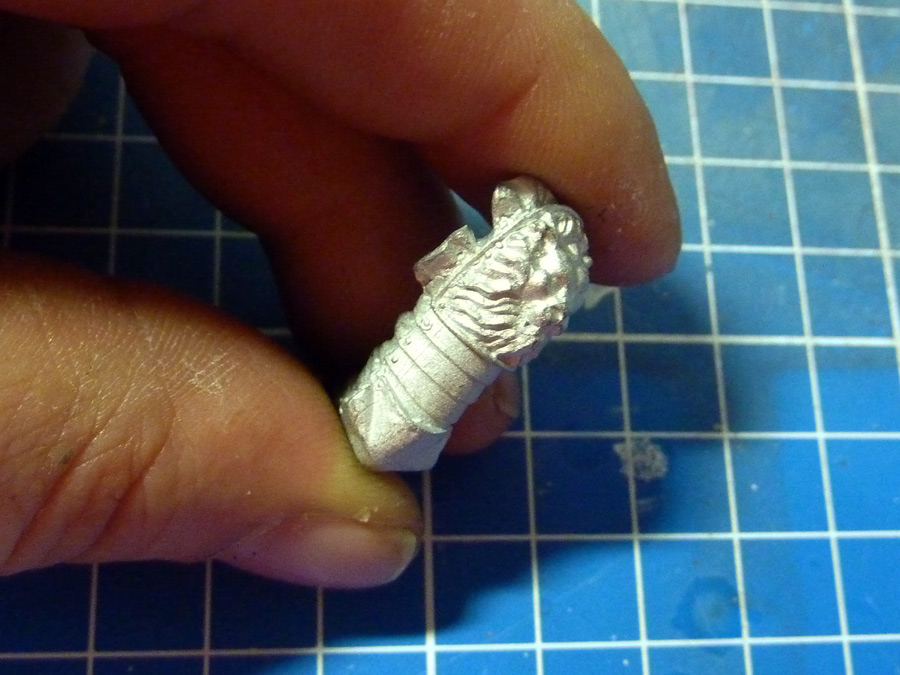
1x Main Body
2x Arms
1x Leg
1x Tail
2x Horns
1x Shoulder Armour
1x Head


Taking a closer look shows me already that this sculpt is not a good miniature for absolute beginners. Without thinking about the painting i already could see that there is much work to do in preparation. The model comes in good quality resin and is easy to handle if you know how. In fact the first closer view showed me that there is much time needed for bringing the big bull together and as this would be a bit more challenging than glueing together a Bust i've decided to do an article about preparing resin soon. Now bakc to topic. The closer view - work ahead:

In fact preparing a miniature for painting isn't my favourite activity, but it has to be done so i do it. With Hombre Toro it is a whole different story. Sometimes Miniatures call your name and there is no sign of disbelief in my chest - i was really looking forward to prepare him. Having a closer look at all the parts shows that the work isn't that hard as it looks on the first sight. Sure there are mouldlines but the model itself fits together very well - and hey c'mon mouldlines in Resin, they are gone already when i am introducing and showing them my sandpaper. Here comes the closer look report:
The main body is such a beautiful part and allows already visions of the dynamic pose when the model is completed. I had an bad ass evil mouldline on his right flank but i told you sandpaper (soon there will be an article about it). You also have small pins everywhere on the parts that you have to remove before you can check the accuracy of fit. So i did with my caliper (preview to the article, yeah wow!):


I discovered some problems with the accuracy of fit at some places but did not have big problems to work with the resin and make it do my will.

The smaller parts have to be threated with gentle hands as they are really thin, but the Resin of the Spherewars cast is really good, so no problem there too. I just love to see the single parts as every muscle, every wrinkle, every motion fits already to a great vision. Even the cast is not perfect and there is work to do i just don't care as i can do clean and prepare Resin - passion hit me again with this sculpt and where passion appears worries are far away. Maybe i am recalling this when writing the article about the preparation but i don't think so - i already did it and i already know that it wasn't that bad :)

After the Preparation process, including cleaning, sanding, fixation, etc. I am still stunned like a Turtle after sexual activity - this sculpt kicks butt so greatly with some much elegance and power - i am just stunned and love bring my brush to work on it. Don't you be confused - i did remove a branding on his left back leg during sanding.


If you are intreseted in the question on how big that guy is to your casual 28 mm gaming miniature check this photo!
I do love every muscle of him and already have about 3 different visions for him, but for the first go on him i have decided to just catch the motion and every muscle the sculptor did create. I will just follow his lead and enjoy, so i get to know the model and will be ready for my personal vision which are around 123 at the moment after i already did start painting him. I know i will paint him again and i don't say this very often - here is a little preview and an early work in progress photo...

If you are intrested in this monster check Spherewars Homepage.
Closing Words
The cast is not the best, honestly, but it isn't that bad either - i would say it is normal. With a little experience in how to work with Resin and taking care you will have this bull ready for your brush in about 2 hours plus minus. For me - at this adorable sculpt - the cast comes second - i am just in love and will prepare the "How to prepare a resin Miniature" Article next week to share my experience and maybe help one or the other ... in this little Miniature world there is nothing anyone should fear :)
If you are intrested you can find more Miniatures Unpacked here!
Keep on happy painting!
Best Regards
Roman
Sponsor a cup of coffee if this article helped you...


